Recreating the Urs Graf Mercenary - Part 1: Planning and the Wams/doublet
This will be a breakdown on how I made my Urs Graf inspired outfit; These wams and hosen are pretty complex and I wouldn't suggest something like this for a beginner but hopefully there will still be some tricks that crafters at any level can utilise.

Disclaimer: I'm pretty new to making historical stuff and in no way an expert so please forgive my basic/non-HA language when describing things also I'm learning new stuff everyday so if you wish to correct me on anything all I ask is that you use historical evidence to back it up just so I know that I am re-learning the correct thing.
Here's a little glossary:
HA - Historically accurate
Wams - Doublet/jacket
Hose/hosen - Pants


Here is a picture of my plan; for colour planning I would usually print out a copy of the woodcut and colour it in but alas my printer was broken.


As you can see the initial pattern is quite blocky and basic! The large sleeve holes will help with accommodating boobs if you have them.


I was feeling brave so I decided to just cut the wool before proofing the pattern (and ironing the fabric) Sewing curvy seams can be tricky but all it takes is some trial and error.


I used a neutral coloured grey/green thread for finishing as it hid well on both sides, I prefer my stitches to be barely visible but I'm not your mum so you can skip this or finish the garment however you like

We're going to do the easier striped sleeve first!


I cut the sleeves using a sharp box-cutter, make sure that you change the blades often because they get blunt VERY quickly


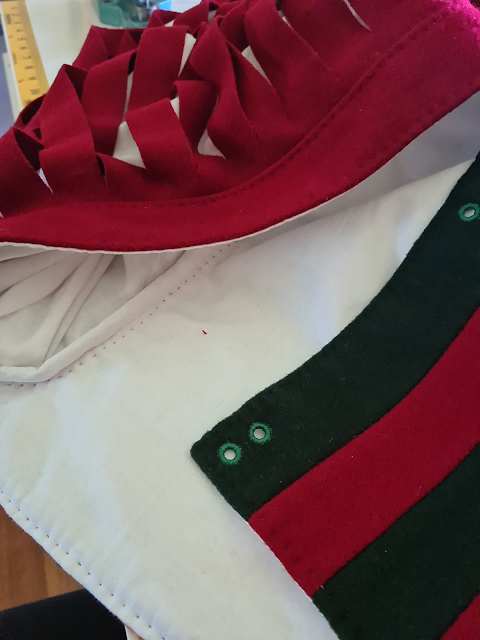

I like to commit heresy by using metal eyelets then whip stitching around the edges to make super neat looking lacing holes as my normal eyelets often look very ugly.

Landsknecht - German Mercenary
Reislaufer - Swiss Mercenary
To baste something - loosely sew layers together so they're easier to sew
to make something square - a perfect right angle, this is important for pattern-making
Step 1 - Research and analysing the source material
This is THE MOST important step, it is so easy to just glance at something take the bits and pieces you like then make something that resembles the source material however I really wanted to give this outfit a good try because I really love Urs Graf's work.
A little about Urs:
Urs Graf born 1485 in Solothurn, Switzerland was a Swiss Renaissance goldsmith, painter and printmaker who regularly abandoned family and workshop for military campaigns as a mercenary in search of adventure and booty.
Urs Graf born 1485 in Solothurn, Switzerland was a Swiss Renaissance goldsmith, painter and printmaker who regularly abandoned family and workshop for military campaigns as a mercenary in search of adventure and booty.
Graf primarily depicted the political climate, social conditions, and erotic themes. He often depicted violence, such as Two Prostitutes Beating a Monk, and chronicled brutish battlefield life alongside majestic Alpine landscapes. However, he sometimes gave his pictures an air of fantasy by using lively, curling strokes (Which I love as it contrasts with the more blocky style work of German artists like Erhard Schon; it's sort of like comparing art Nouveau with Deco)
Because Urs mostly depicted Reislaufer I am pretty sure that the guy in this etching is Swiss but it's pretty hard for a newbie like me to tell the difference when they're not wearing their particular markers.
Now lets point out some important things and common mistakes people may make when making Swiss/German mercenary garb
We'll get my main pet peeve out of the way first; You see the red there? do you see how high these hose sit? That's his waist! Yes! These hose go up to the waist because the hourglass silhouette was fashionable for most of the 16th century! This is so important for getting the "look" right yet it is too-often a detail that is overlooked
Here is another display of my excellent mspaint skills; I call this one "Modern menswear is a crime"
Plus sized? Often the waist will move up rather than down to accommodate curvier shapes, also you must remember that they used illusions like big sleeves to make themselves look like they have a smaller waist as well as the fact that most etchings would likely depict the subject how they want to be depicted ie. with a more fashionable silhouette
Another important thing is where the sleeves sit, they're coming right out from the waist! The shoulder is slipping quite a lot so I decided to make sure the front would be able to accommodate that.
Here is what I referenced for the front; it's not the same outfit but the top/wams drape off the shoulder in the same way as my main reference.
I chose to keep the front relatively basic because I knew the back would be the focus, I also ended up changing the full hose leg to a 3/4 length pant with socks because I hate the idea of needing to change my pants if my socks get wet (very common when you wear low and slashed shoes). There was also some swapping of the arms and legs to cover tattoos when I was at the patterning stage.
Fabric:
I will be using wool for the outer, interlining with cotton drill then the main lining is a cotton/linen blend. Fabric choices are absolute garbage in Australia and it is difficult to find any type of natural fibre fabric aside from cotton for a reasonable price, especially wool! The green wool I used for this is actually a recycled green cloak and the red is a similar heavy weight, I would not usually suggest using such heavy wools for something like this and would encourage people to buy a lighter or boiled wool if possible!
Step 2 - Patterning the wams
These wams/doublet are fun because of the cool sweeping design that starts from the waist and ends at the sleeves, the first thing I did was make a blank wams pattern. Now you can do this however you want; flat patterning, draping or a combination of the two which is what I usually do
As you can see the initial pattern is quite blocky and basic! The large sleeve holes will help with accommodating boobs if you have them.
So the stripes is where this starts to get a bit more complicated:
The main goal of patterning these stripes is to make sure that when they hit the sleeve hole they're square and are evenly spaced apart, first thing you should do is divide up the sleeve hole then divide the waist. To make the pattern pieces I trace off each section onto baking paper then give it a 1cm seam allowance, I think that it's important to keep your initial draft in one piece so you always have something to use to replace missing pattern pieces
Step 3 - Constructing the bodice
I was feeling brave so I decided to just cut the wool before proofing the pattern (and ironing the fabric) Sewing curvy seams can be tricky but all it takes is some trial and error.
Luckily it worked out! I love that wool is very forgiving when it comes to getting ironed a lot. Next up is the lining
(this was also the point where I did the little shoulder slashes in the back)
So here is the front which is just a modified version of the back
I basted the interlining to the lining fabric together then bag-lined the whole bodice while leaving the sleeve holes open, I then prick stitched around all the edges as it is easier to do it before the sleeves as they're quite cumbersome.
Step 4 - Sleeves!
Starting off here is a breakdown of the sleeves
We're going to do the easier striped sleeve first!
The way I patterned the striped sleeves was getting the strip width from the bodice (all the strips should be the same size) and then tapering the sleeve down to my wrist measurement, I usually make my landsknecht sleeves about 80-110cm long so I get plenty of fullness.
Simply sew all your weird triangles together and you'll eventually get a sleeve
Please note that if you're doing 2 colours you will need an even amount of strips, I found that eight strips looks good
If you did all your measurements right your sleeve should match up nicely with the bodice.
On the inside of the sleeve there is lining that is the true length of my arm which will prevent the outer sleeve slipping down, I usually attach the outer sleeve first then the sleeve lining to the bodice lining with bias-binding to cover the inside seam.
You can either bag line the cuff of the sleeve or put a binding around it to finish it
Now for the fun* slashed sleeve!
*not fun
So the above is what I referenced for how some slashes sleeves were made, this is a woodcut by Jorg Breau the younger (1525-1530)
Seems like its just one tapered piece with a seam that runs along the bottom
I didn't want to waste time paper patterning this part so I just did it with chalk onto the fabric, the sleeve is about 120cm long, the shoulder is the same circumference as the sleeve hole and it goes down to my wrist measurement. Like the original I am dividing the sleeve into 8 parts then doing 1" thick slashes with a 1" gap of fabric between the rows of slashes
Also I apologise for jumping between inches and centimetres, I tend to use whatever is more convenient at the time
Merlin "helping" me with the lengthy task of slashing these damn sleeves
I cut the sleeves using a sharp box-cutter, make sure that you change the blades often because they get blunt VERY quickly
Here is the sleeve after slashing, next I did the white puff for the inside which was roughly 2.5m x 1.2m rectangle folded in half and gathered at either side to fit the sleeve.
For the inner lining I did the same thing as the other sleeve which was a normal length sleeve sewn to the doublet lining.
This is the completed sleeve! I only did a few tack stitches to hold the rows of slashing and puff in the right place.
Here is a shot of the inside of the wams; notice the binding around the sleeve hole and the little prick stitches to keep things in place
I like to commit heresy by using metal eyelets then whip stitching around the edges to make super neat looking lacing holes as my normal eyelets often look very ugly.
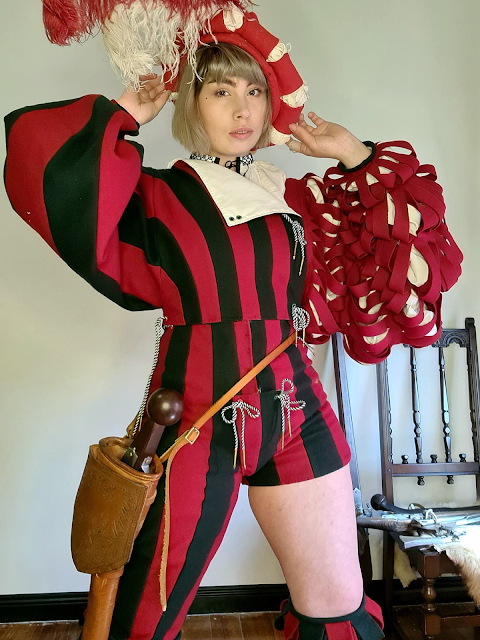
And it's all done!
Here are some extra photos of the completed doublet~
Apparently green and red are difficult for the eye to read in certain lights which is why I think in some photos the green appears to be a greyish/almost black colour, I call this the "Freddy Krueger effect"
Reflection:
There are some things that I learned from this project;
- Use a thinner wool because this stuff gets really bulky around places like wrists where there are lots of seams, also this doublet would be a no-go for hot Australian summers
- I'd be tempted to make the non-slashed sleeve even longer so its even bigger
- Lower the front neckline by a couple cm
- Reduce the slashed sleeves width by a little because I almost had too much slashing (hard to believe I know)
That's all for this part of the tutorial! Next time I'll be doing the striped hosen and socks, if you found this helpful I'd love to know so I'm motivated to continue posting tutorials like this in the future!
Happy sewing friendos <3
This is so cool!! I had definitely mistaken the green for a much darker greenish black in the photos.
ReplyDeleteReally nice work, we are early 16th century reenactors from East France, and we will use your advices to make our outfits. We can't wait to see your futur post, like the socks and the Hosen. besides I'm a history of art student, and my master project is Urs Graf. Hope to have some news soon.
ReplyDeleteIt's beautiful 😍 can you sit in that hosen? I'm a curvy person and I'm fighting the balance between beautiful fitted and moves without tearing out the crotch out.
ReplyDeleteThank u so much, u helped me such a great deal, i made my own last year after ur tutorial, i just didnt had a wool fabric that wouldnt loose threads, but it looks amazing and it feels great. This year iam gonna make a new one and polishing out a few mistakes i made, but this wouldnt be possible if not for u, u explained it so damn well. Thank u thank u thank uuu
ReplyDeleteThank you a bunch for this. im a little bummed I still don't know the exact name for the slitted parts of the wams and pluderhosen, but this has been very useful for an art reference. :)
ReplyDelete